
Tutorials
The Comprehensive Guide to Managing WooCommerce Email Notifications (2023)

Apr
Anyone who runs a WooCommerce store understands how crucial email notifications are for establishing strong communication with both customers and internal and external staff.
Automatic emails can be used for a wide variety of purposes that benefit everyone connected to your eCommerce store, including order notifications, informing suppliers about low stock levels, and putting together robust email marketing campaigns.
There are some options to send email notifications from within default WooCommerce, but in truth, those options are pretty limited. To get the most benefit from email notifications, you’ll need to use additional WooCommerce plugins.
In this post, we’ll take a close look at why WooCommerce store owners should utilize email notifications and how to set them up from within the popular eCommerce platform. We’ll also run through how you can manage common email notification problems and the plugins that can help you to get the most value from your emails.
Why should you send email notifications from WooCommerce?
Sending WooCommerce email notifications can bring a wide range of benefits to both your business and your customers. Let’s take a look at some of these in more detail.
Improve customer experience
Providing a good customer experience is crucial in helping to encourage repeat business and referrals. Sending notifications such as new order emails or shipping update notifications can help in keeping your valued customers up to date about the status of their orders, which can also help to manage their delivery timescale expectations. These emails give customers peace of mind of knowing exactly where their order is and when it will arrive.
Email notifications can also help to provide your customers with all other kinds of important information, including order details, FAQs, and next steps, without them needing to reach out to a member of staff.
Customers will feel especially valued when they receive personalized custom emails – for example, if they receive custom product recommendations or a coupon code as part of an email thanking them for their purchase.
Increase sales
A successful eCommerce store must have repeat customers, not just one-time customers. With email notifications, you can encourage your customers to make another order by including details of special offers or upcoming promotions.
Email notifications can also be highly effective in getting people who have signed up for your website but who have not yet made an order to take action. A welcome email that includes a discount code can be a great way to encourage new customers to place their first order.
Similarly, stock notifications that let customers know when products they have shown interest in are back in stock or on sale are a great tool for nurturing potential customers into converting.
Make your fulfillment process more efficient
Email notifications can help to drive sales, but they also help to make your internal operations run more smoothly. For example, order notifications can be sent to your fulfillment staff at every stage of the journey, from when an order is placed to when it’s ready for shipment, which can result in a smoother fulfillment process.
There’s no limit to how beneficial email notifications can be for fulfillment efficiency. For example, you can alert your suppliers when your stock levels for a particular item are running low, or inform your dropshipping partners when an order is ready for collection.
Finally, email notifications help to make the most of your staff’s time, since they preemptively answer common customer questions about stock levels, delivery timescales, and so on, allowing your team to focus on value-adding tasks.
How do you set up WooCommerce email notifications?
WooCommerce provides default functionality for sending email notifications from within the platform. To see all the options available to you, go to your WordPress dashboard and then click WooCommerce > Settings, and navigate to the Emails tab.
What types of email notifications can you send with WooCommerce?
There’s a long list of email notifications that you can send to both customers and staff using WooCommerce’s default email functionality. These notifications fall into two categories: transactional emails and administrative emails.
Transactional emails
- New Order
- Failed Order
- Canceled Order
- Processing Order
- Order On-Hold
- Completed Order
- Failed Subscription Renewal
- Refunded Order
- Payment Authentication Requested
- Pre-Order Payment Action Need
Administrative emails
- New Account
- Reset Password
- Customer Note
Check out our complete guide on setting up WooCommerce email notifications for more information on the different types of transactional emails you can send from WooCommerce and how to set them up.
How do you customize WooCommerce email notifications?
Customizing your WooCommerce email notifications enables you to send more personalized messages to your customers and include company-specific details like branding and upcoming promotions.
WooCommerce provides a few options for adjusting the look of your internal and external emails. For example, you can change the appearance of your email notifications by navigating to the email settings page within WooCommerce. Once there, you’ll be able to:
- Add a header image.
- Change the color of the background and text of your emails.
- Add footer text.
WooCommerce also allows store owners to make limited changes to individual emails. To do this, just head to the settings page and click on the email you need to customize. From there, you can:
- Change the text of the heading and email subject.
- Include text at the end of the email.
- Choose to display the email as HTML or plain text.
- Alter the recipient address (only applies to internal emails).
Finally, you can also configure product-specific information to be included in emails sent to customers who have ordered a particular product. To do this, simply find the product you want to edit from the WooCommerce products area, then navigate to Product Data > Advanced.
From here, you can add custom text to the “Purchase Note” field. Once your text has been saved, the text will automatically display in any transactional emails relating to orders that contain that product.
Unfortunately, that just about covers the changes you can make to your WooCommerce email notifications using the core WooCommerce email settings. To make further adjustments, you’ll need to make coding changes to your email templates, which you can do from within your WordPress theme’s PHP folder. This isn’t recommended unless you have coding experience or access to a developer who can adjust your WooCommerce email templates for you.
Can you add custom email notifications in WooCommerce?
Default WooCommerce doesn’t support the addition of custom email notifications – if you want to add any email notifications other than the ones outlined above, you’ll need a plugin. We’ll run through how to build your own custom email notifications using a recommended plugin a little later in the article.
Why are my WooCommerce email notifications not sending?
Problems with your WooCommerce email notifications? You’re not alone! Many WooCommerce store owners experience issues with WooCommerce email notifications not working. Fortunately, there are some straightforward steps you can take to troubleshoot the problem and ensure your notifications reach the intended recipients.
Check if your new orders are pending
As transactional emails in WooCommerce are tied to specific order statuses, a common problem with email notifications not sending is that the required order status hasn’t been reached. The most common culprit for this is new orders not automatically moving to the ‘Processing’ status. There are a few reasons why this might happen:
- The customer’s card was declined.
- There’s a problem with your payment gateway.
- The customer left the payment page before their payment was processed.
In order to determine if the problem is with your email notifications or whether it has been caused by some other issue during the checkout process, you’ll want to navigate to your WooCommerce orders page and double-check that any orders you are expecting to receive notifications for have been set to the correct status.

Check your email settings
If your order statuses all look as they should, your next port of call is to check out your email settings. To check this, navigate to the email settings page, then click on the specific emails that you have been having problems with. Check that the box for ‘Enable this email notification’ is ticked for all the emails you want to be sent to your staff and customers.
If emails are still failing to send, try changing the email type to plain text. Some email providers don’t provide support for HTML messages, which could mean that your transactional emails never make it to your customers’ inboxes.

Check if emails are being sent, but not received
If your orders are updating to ‘Processing’ and all your email settings are in order, but your emails are not reaching the intended recipient, then it’s possible that your emails are being caught in a spam filter.
If you’re using the core WooCommerce functionality to send your emails, you can check which emails are being sent and whether any errors are occurring with the help of a free email logging plugin like WP Mail Logging. Alternatively, if you’re using a custom notification plugin like Flow Notify to get more out of your email notifications, you can make use of the built-in email logging functionality.
If your emails are being sent but not received, ensure that your emails are being sent from an email address attached to your own domain, as public domain email addresses like @gmail.com are more likely to land in spam folders.
If your emails are still not being received, consider signing up for an account with a dedicated SMTP provider that will send your emails for you. There is a wide range of SMTP plugins available for WordPress, but one popular option that enables you to send unlimited free emails every month (up to 1,000 unique recipients) is MailPoet.
Following the above troubleshooting steps should help to resolve some of the most common issues with WooCommerce email notifications not sending. If you’re still stuck, we have a complete guide on how to fix unsent email notifications in WooCommerce that we recommend checking out.
How to optimize your WooCommerce email notifications
WooCommerce’s in-built email notification system provides a handy starting point for straightforward communication with your customers and staff. However, it does have some fairly substantial limitations. For example:
- Notifications have a pre-defined, non-changeable recipient, either the store admin or the customer.
- Adding new custom email notifications is not possible.
- Meaningful customization of email notifications, beyond the basic changes we have already covered, requires coding expertise.
A supplementary plugin can help you to get the most from your email notifications. In this next section, we’ll look at how store owners can create and customize email notifications using Flow Notify and use the WooCommerce Advanced Notifications extension to send emails to custom recipients.
Tutorial: How to create custom email notifications with Flow Notify
Flow Notify is a powerful automatic notification plugin that’s essential for WooCommerce store owners looking to upgrade their email notifications. Once the plugin is installed, store owners can create custom notifications that are automatically sent based on triggers such as new account creation, review capture, and order status changes, among others, as well as benefit from a wide range of features not available via WooCommerce’s core functionality.
The plugin allows you to send advanced notifications to both customers and staff at a stage of your choosing, thanks to its ability for store owners to create custom order statuses and notifications.
To create and customize a new email notification using Flow Notify, simply follow these steps:
- Download and install Flow Notify.
- From within WordPress, go to Flow Notify > Notifications, and then click ‘Add.’
- Type a name and choose a recipient (store admin or customer) for the notification. From there, select the type of notification (email, WhatsApp, or SMS).
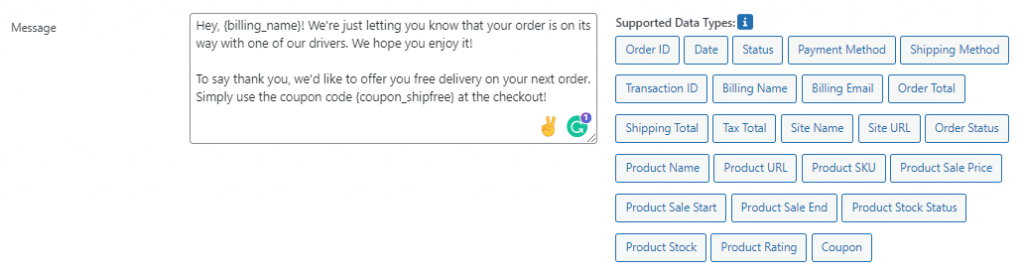
- Add your message. You can use a combination of plain text and WooCommerce data fields, enabling you to automatically add dynamic data, including order details, customer names, and shipping addresses.
- Set your notification trigger, such as an order status change. You can create your own order statuses or use WooCommerce’s core order statuses. To learn how to create custom order statuses using Flow Notify, check out our complete guide.
- Once you’ve saved your changes, your new email notifications will be sent to your customers or admin once the trigger requirement has been fulfilled.
Tutorial: How to send notifications to custom recipients with the WooCommerce Advanced Notifications extension
There are good reasons to send notifications to custom recipients using the WooCommerce Advanced Notification extension. For instance, it’ll allow you to automatically send messages to dropshippers or suppliers, helping to avoid missed orders, improve your fulfillment process, and ensure that your popular products are always kept in stock.
To set up this functionality, follow along with this tutorial:
- Install the WooCommerce Advanced Notifications extension.
- From within WordPress, navigate to WooCommerce > Notifications and click ‘Add Notification.’
- Add the name and email address(es) of the recipient(s).
- Select plain text or HTML as the email format.
- Select which notifications you’d like the recipient to receive. This can be:
- Purchases – sent when an item is ordered.
- Low stock – indicates item stock levels are low (you can choose a threshold for this trigger).
- Out of stock – sent when a product runs out of stock.
- Backorders – indicates an item has been ordered but is currently out of stock.
- Refunds – sent after a refund has been issued.
It’s important to note that much like the default email notifications that are included with core WooCommerce, these notifications use pre-set text which you’ll only be able to edit by adjusting the code of the email templates in your theme’s PHP folder.
- Create your notification trigger. This can be set for all purchases, specific product categories, or product shipping classes.
- Save your changes. Once the trigger conditions that you’ve set have been fulfilled, an email will be sent to the recipient(s) that you’ve included within the settings.

Get more out of your WooCommerce email notifications
WooCommerce email notifications can help to enhance the customer experience at your online store and help your fulfillment staff to work more efficiently. Ultimately, email notifications benefit everyone. But to get the most from this functionality, you’ll need to look beyond the built-in functionality of core WooCommerce and install supplementary plugins.
Store owners looking to optimize their WooCommerce email notifications should look to Flow Notify, a plugin designed with this particular purpose in mind. Once the plugin is installed, you’ll be able to:
- Send communication notifications via email, WhatsApp, and SMS.
- Add custom order statuses, so you can send notifications at a time of your choosing.
- Create custom notifications, which you can personalize with dynamic data drawn from WooCommerce.
If you’re ready to unleash the full potential of your email notifications, then try Flow Notify from $49/year with a 30-day money-back guarantee.