
Tutorials
How to Set Up and Customize WooCommerce Order Notification Emails

Dec
Do you want to keep your customers updated about the latest status of their orders when they buy products from your online store? Transparency throughout the entire fulfillment process is vital to ensuring a good experience for everyone involved. In fact, 83% of online shoppers say that they want regular communication regarding their order status.
If your eCommerce store is running on WordPress and WooCommerce, you’ll notice you have access to some built-in functionality that allows you to send order notification emails to your customers when they buy something from your website. However, this functionality lacks flexibility when it comes to the precise content of these messages and at what stages of the order process they can be sent.
In this article, we will show you how you can set up and customize WooCommerce order notification emails for your store and share some tips for making these messages more flexible and powerful.
What Are Woocommerce Order Notification Emails, and Why Are They Important?
Anybody who has done some online shopping will be familiar with order notifications or transactional emails, a cornerstone of eCommerce email marketing. You make a purchase, and you receive an order confirmation email (or “new order email”). This message might also be followed up by others letting you know the product is on its way or has been delivered.
Email notifications are a helpful means for online store owners to keep customers updated about the status of their orders. They can also provide a channel for answering any questions they might have about the fulfillment process.
We’ve just mentioned two examples of things you can do with order notification emails – letting your customer know you’ve received their order and updating them about what stage of the fulfillment process their order is up to – but there’s so much more you can do even with order notifications. For instance, you can use these messages as a useful way of keeping fulfillment staff up to speed with the progress of orders or even trigger the start of specific process steps.
So, before we delve into how you can use notifications to improve both your customer experience and boost your shop efficiency, let’s quickly go through the different types of order (or after-order) emails you can create using WooCommerce.
Emails to Customers
You’re probably very familiar with this type of order notification email. You place an order at your favorite online store, and soon after, you receive a message in your inbox confirming your purchase. Typically, this type of notification email will include all the relevant details about what you’ve just bought and information like tracking details and the store’s shipping policy. In some cases, you might get more messages as the order moves from one stage of the fulfillment process to the next – for example, “order processing”, “order out for delivery”, and “order delivered”.
These notification emails are vital for keeping your customers in the loop regarding the status of their orders, not to mention a great way to answer common questions customers might have about their orders without the need to spend time manually responding to queries. In this way, they are important for customer experience but also for your store’s efficiency.
Emails to Fulfillment Staff
Not all order emails go to customers. Some, in fact, are used to keep the whole process of delivering orders running efficiently. You can use order notifications to can tell your staff that someone has made a purchase, prompting them to start the order fulfillment process. They are also useful for informing your team that orders have been canceled or if a refund is requested.
The most important goal of these order notifications is to ensure that the fulfillment process runs as efficiently as possible and that every product reaches its destination. So, in reality, they are just as important to user experience as the notifications you send directly to your customers!
How Do You Set up Automatic Order Notification Emails in Woocommerce?
By default, WooCommerce allows you to set up and send automatic after-order emails to your customers and fulfillment staff using triggers. These triggers are, in fact, WooCommerce order statuses set by the system itself. Unfortunately, there are limited customization options available within default WooCommerce – both in terms of when these automatic order emails are triggered and what they can include.
Configuring these email notifications is fairly straightforward, and you can do it directly from your WooCommerce dashboard. All you need to do is navigate to WooCommerce > Settings and then click on the Emails tab. You will immediately see a list of all automated WooCommerce emails you can click to make any relevant changes, including:
- Enabling and disabling emails.
- Configuring specific addresses in case you don’t want to send internal emails to the store admin as standard.
- Setting up custom email subjects and headings and adding any additional content you wish to the body of the message.
By default, WooCommerce can send the following automatic order notifications via email:
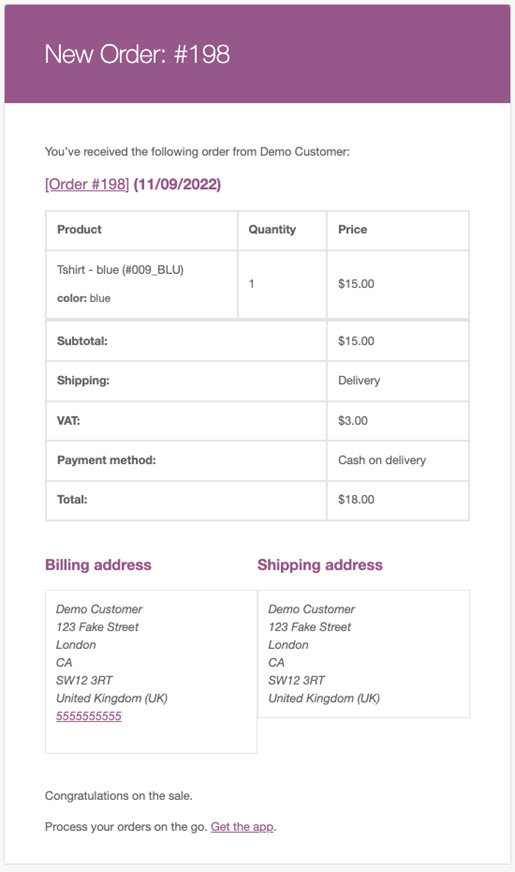
- New Order: All new order notifications will be sent to the store admin (at a pre-defined email address) by default as soon as someone makes a purchase in your WooCommerce store.
- Canceled Order: When an order is canceled, the system also sends a message to the store admin.
- Failed Order: There are many reasons why an order might fail; for example, a payment being declined or a customer inputting incorrect or incomplete information. In this case, WooCommerce will also send an email to the store admin.
- Order On-Hold: This message is automatically sent to the customer who placed an order if it’s put on hold. This order status change can occur, for instance, when a payment needs to be confirmed (such as when a customer pays for a product using an unconventional method like a bank transfer). As the store owner, you will need to verify the order before it can be processed further.
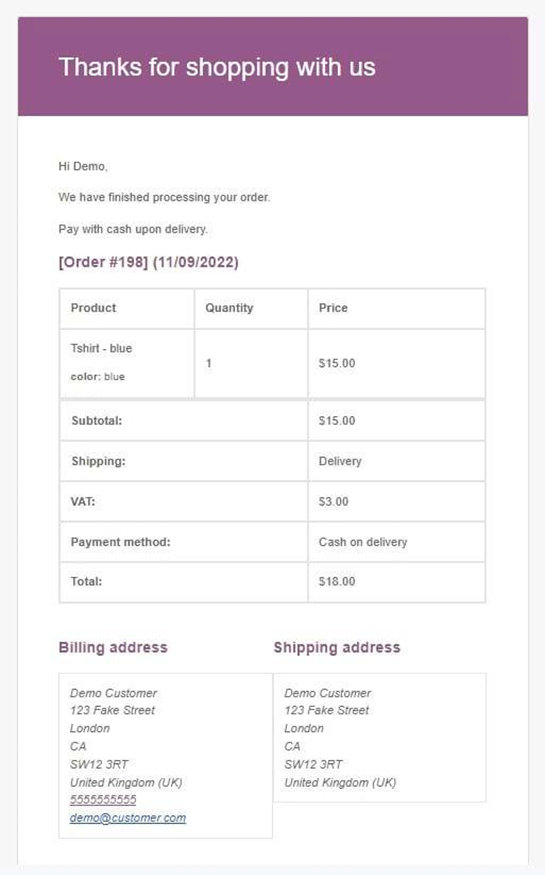
- Processing Order: After payment is successful, the system sends the customer a processing order message. This is the type of email most people will typically think of when they hear the term “order confirmation”. Within this message, the customer can find important details about their purchase, including the order contents, customer details, and email address.
- Completed Order: This email is sent to the customer once the order has been marked as ‘completed’ by the store owner. The status and message indicate that the order has been shipped.
- Refunded Order: WooCommerce sends this last message to the customer once an order has been refunded and the status has been set to ‘refunded’ by the store owner.
One important thing to note: You can override and edit any of these email templates. However, in order to do so, you will need to directly edit your theme’s php folder, something that requires some experience with HTML coding. Unless you’re an expert, we do not recommend doing this. It’s much more straightforward to use one of the many customization options available through a dedicated plugin.
Using Flow Notify to Customize Your Notifications
With Flow Notify, an all-in-one plugin from BizSwoop for managing your WooCommerce orders, you can set up automatic order notification emails for any order status – and even configure your own custom order status. Let’s take a look in more detail at some of the things you can do with this powerful plugin.
Automated Text and Email Notifications
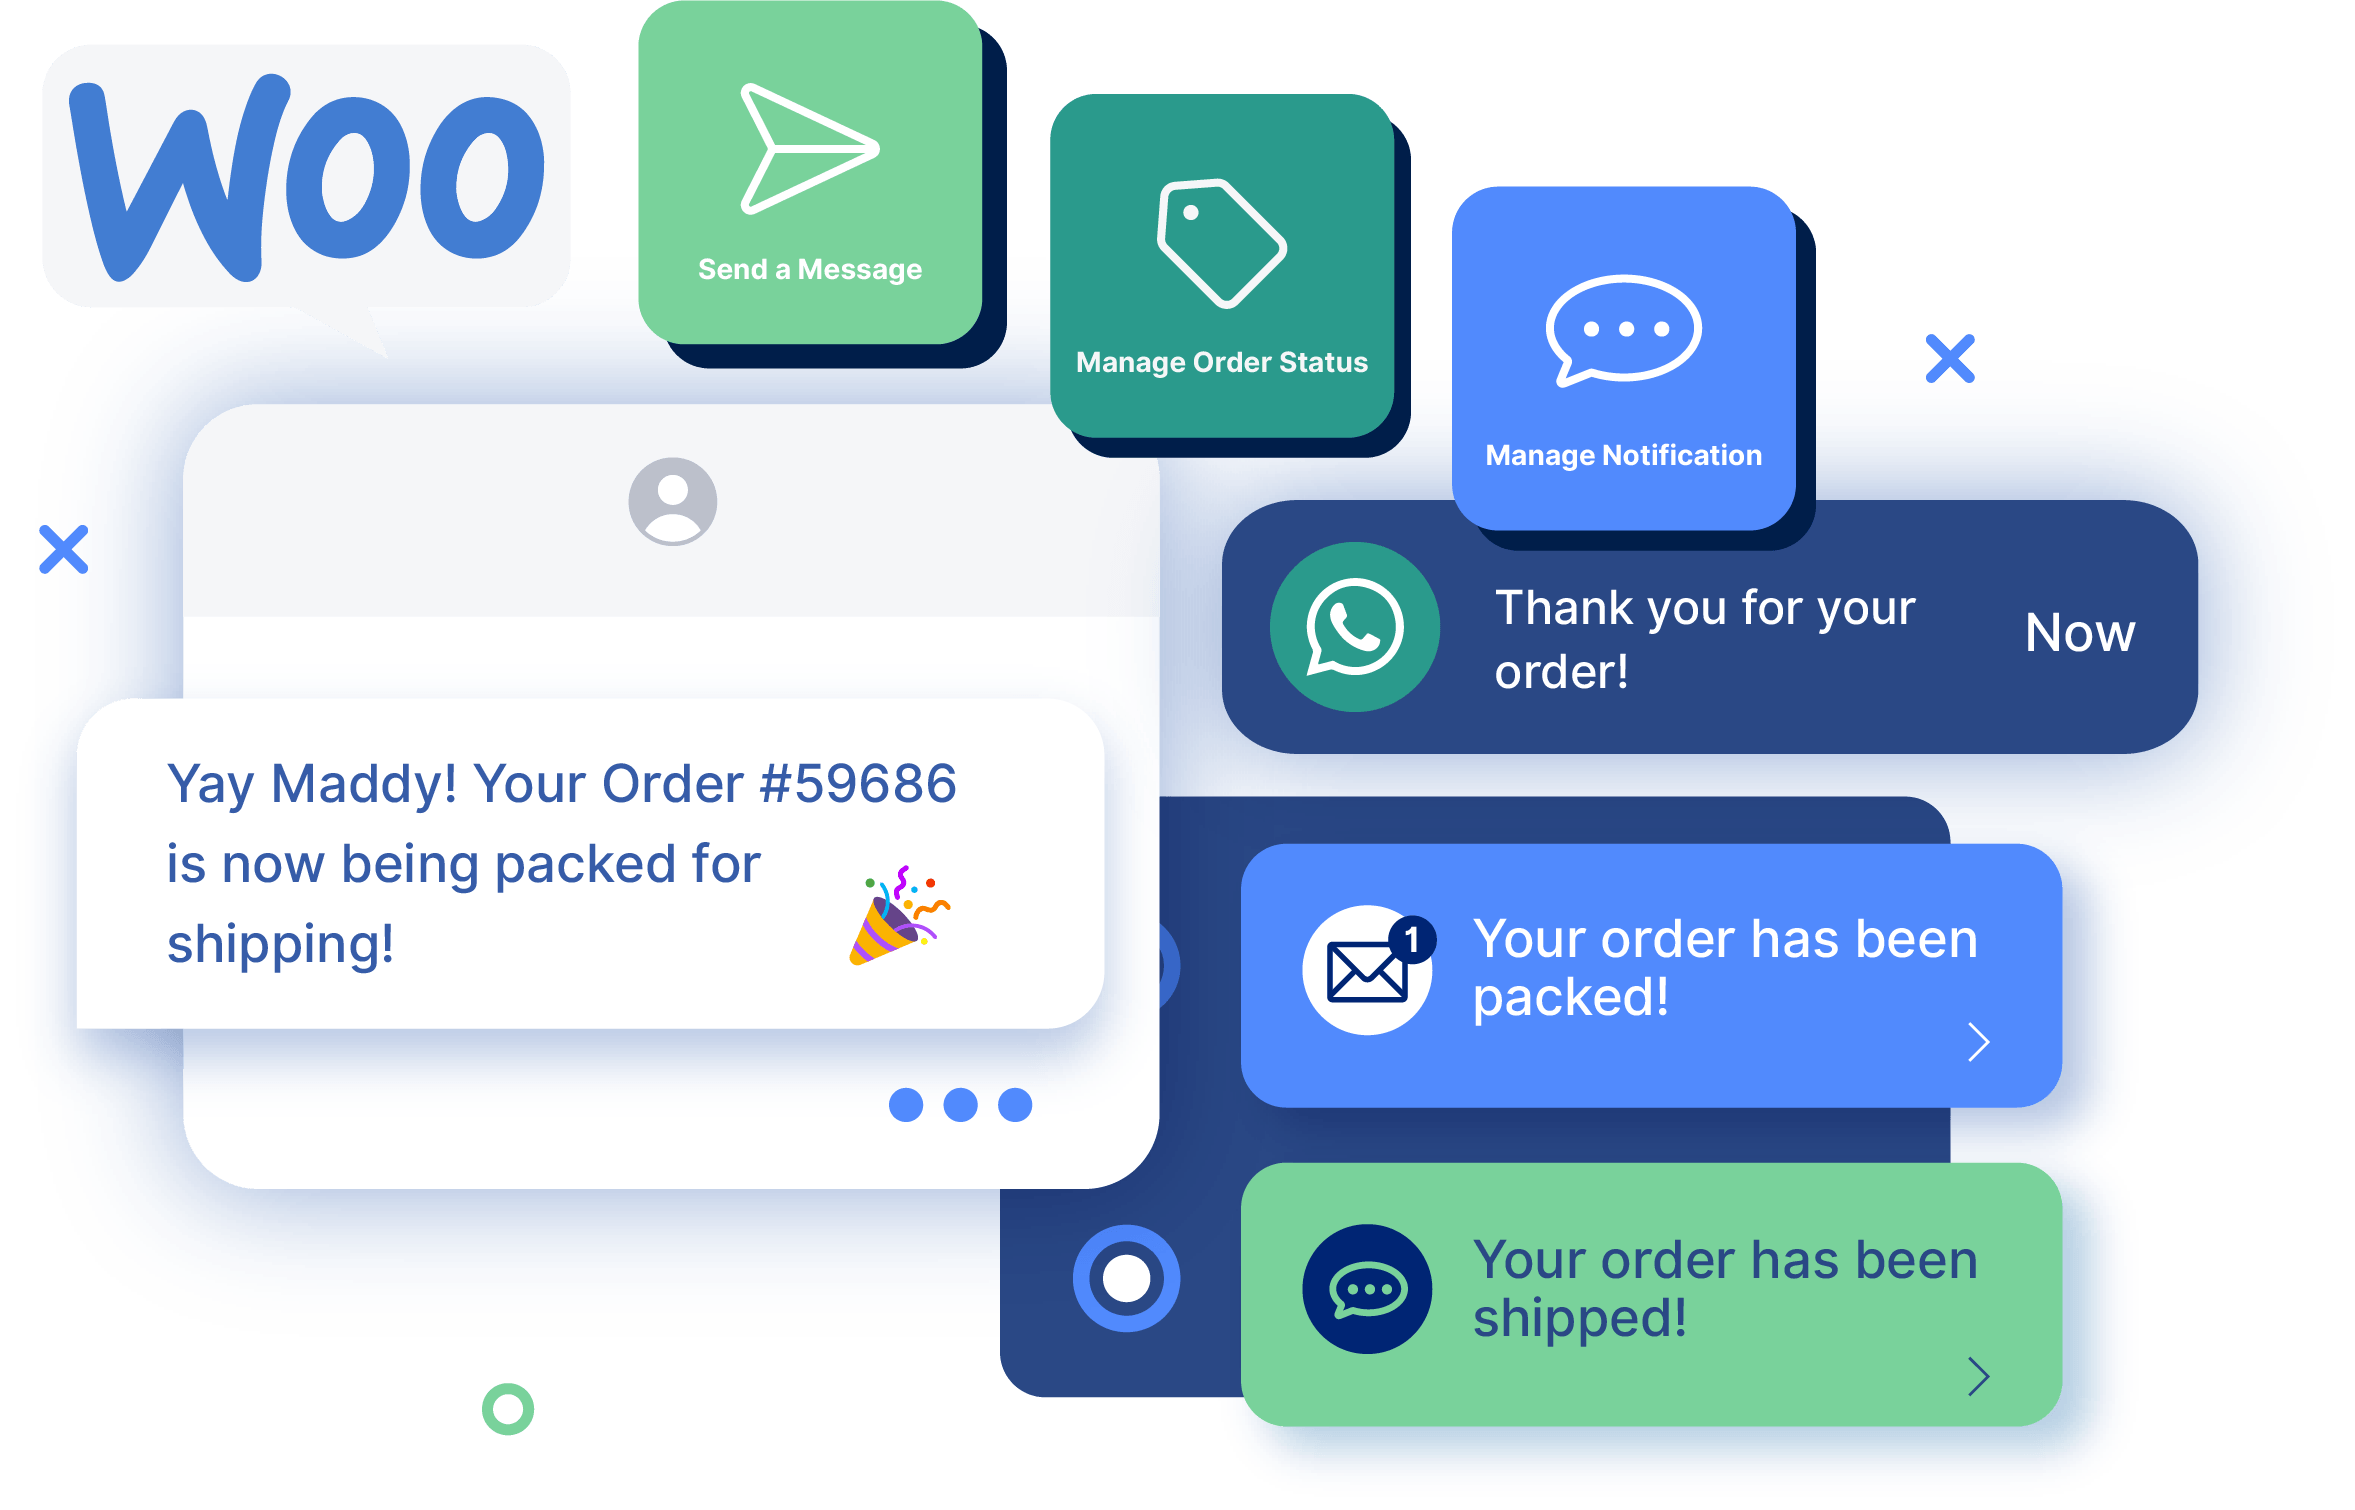
Using Flow Notify, you can easily set up and customize your notifications so they can be sent via SMS, email, and WhatsApp (with more integrations being added all the time).
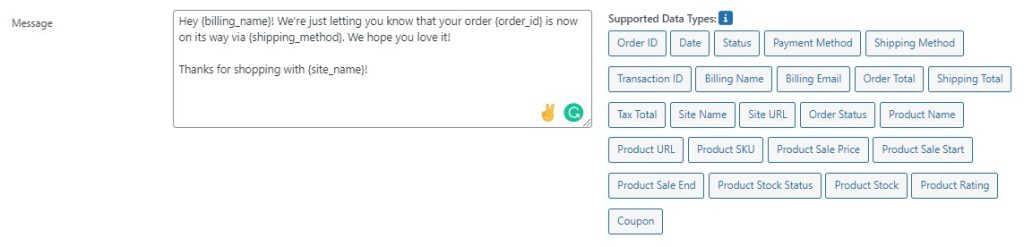
You can also personalize your emails and messages using WooCommerce data fields, which allow you to easily pull in dynamic data about both the order and the customer. These fields can contain anything from order ID and product data to the shipping details and payment method used by the person making the purchase.
All of this is easy to include using Flow Notify’s straightforward notification builder. All you need to choose a pre-defined order status to trigger your custom notifications, and Flow Notify does the rest, saving your fulfillment staff time and improving your overall customer experience.
Custom Order Statuses
Just as every WooCommerce store is different, not all fulfillment strategies are the same. The ability to create custom order statuses is therefore a valuable tool that can offer you more granular control over your entire fulfillment workflow.
You don’t need to stick to the limiting WooCommerce order statuses. Flow Notify lets you easily add and customize new ones so you can keep better track of your in-progress orders at all stages of the process. And, as we’ve seen, these custom statuses can also be used to trigger Flow Notify’s automatic order notifications.
Efficiency-Boosting Integrations
Flow Notify is part of the BizSwoop suite of plugins, which means that it integrates seamlessly with BizPrint. BizPrint is a WooCommerce plugin that enables you to automatically print receipts, invoices, shipping labels, and a wide range of other documents at any stage of the fulfillment process.
Because BizPrint’s automatic printing functionality is triggered by order status, you can pair this plugin with Flow Notify to automatically print fulfillment documents at custom order statuses. This will help ensure that your staff has precisely what they need when they need it.
How to Set up Custom Order Notification Emails Using Flow Notify
Setting up custom order notification emails with Flow Notify couldn’t be simpler. There are just three main steps you need to follow. Let’s go through them in a little more detail.
1. First, purchase, download, and install the Flow Notify WordPress plugin.
2. Then, it’s time to set up custom order statuses. To do this:
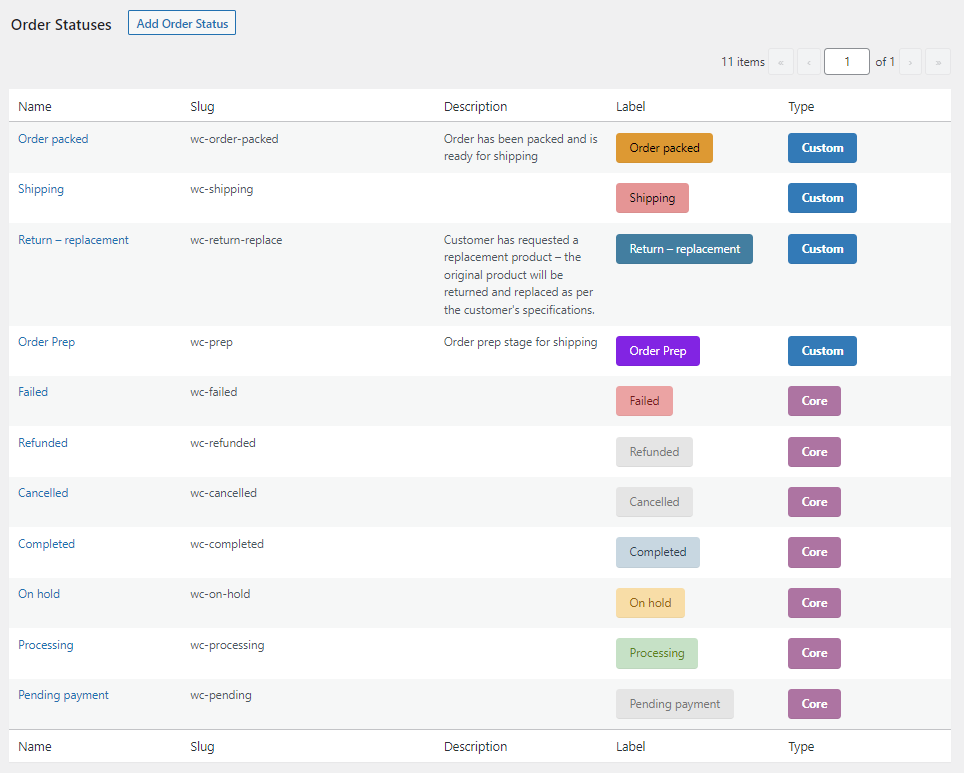
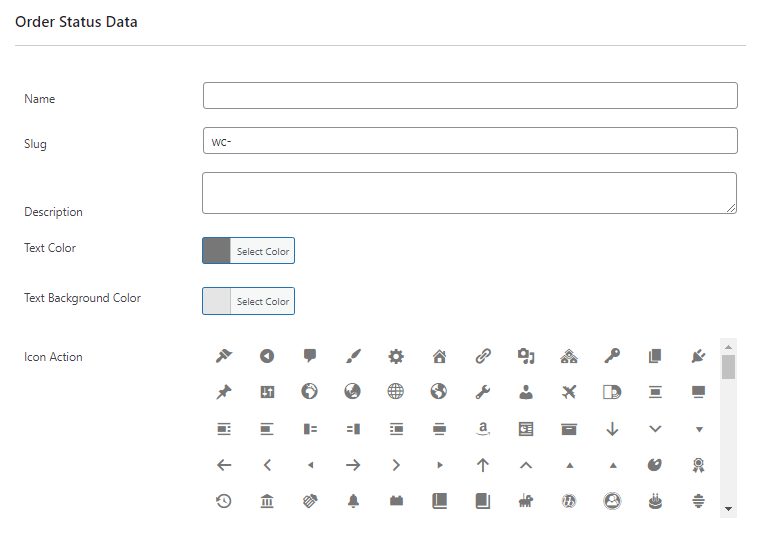
- Go to the WordPress dashboard and navigate to Flow Notify > Order Status. Click on ‘Add Order Status’.
- Set the name, slug, and description for the order status and choose how it will display in the store’s back-end (this is to make it easier for you to identify at a glance).
- Configure where the order status will sit within your order fulfillment workflow by selecting the appropriate option in ‘next statuses’.
- Go through any necessary additional options. For example, you can choose whether you want the order status to be included in bulk actions on the orders page or tag your orders so they can be part of your WooCommerce reporting data.
3. Lastly, you will need to set up the automatic order notification emails themselves. To do this, simply:
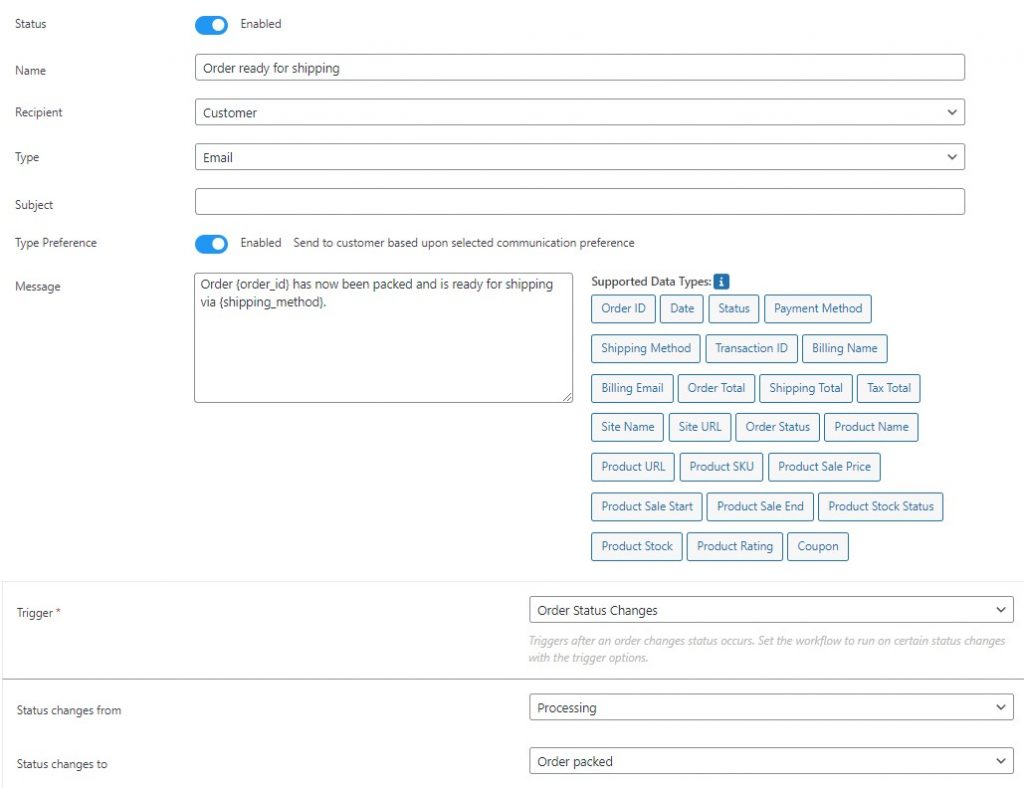
- Navigate to Flow Notify > Notifications, and click on ‘Add’.
- Set the name of the notification and the recipient (for the latter, you can select whether an email will go to the customer or to your store admin address). For example, a potentially useful custom notification for your store admin could be sent at a new “Order Packed” status that triggers a notification for your warehouse manager. Through this message, you could let them know that the package is ready to be shipped and pull in the shipping method dynamically. If you’re using BizPrint, you could even print the shipping label at the same time automatically.
- Next, set the type of notification to ‘Email’ (remember that, if needed, you can also send your order messages using SMS and WhatsApp).
- Write your message. To do this, you can use a combination of plain text and dynamic data fields so you can personalize the notification content and include all the relevant order details.
- Lastly, choose what status will trigger the automatic notification. Following the example we used above, we would set our email to trigger at the ‘Order packed’ status. Of course, you can use any of the core order statuses or any of the custom ones you have created yourself if you want to.
Boost Your Fulfillment Efficiency With Automatic Order Notification Emails
Order notification emails are an essential component of any eCommerce store. They keep both your buyers and staff in the loop as to the current status of a WooCommerce order, improving the customer experience and ensuring that the fulfillment process runs smoothly no matter the situation.
WooCommerce’s default functionality for sending ‘after-order’ emails is pretty limited. If you want to really unlock the potential value of order notification emails, we recommend you use a specialized plugin like Flow Notify, which can give you incredible flexibility so you can control your orders with much more granularity. With Flow Notify, you can:
- Create custom order statuses and link them to your notifications so they can be delivered at any stage of the process.
- Customize all your notification messages with powerful dynamic data fields and send them automatically to customers via email, SMS, or WhatsApp.
- Integrate with BizPrint to automatically print order fulfillment documents using your default or custom order statuses as triggers.